Table of Contents for the INSYTE Website CMS User Manual
Login to the CMS
Content
Edit the Homepage Message
WYSIWYG Buttons
Hyperlinks in a WYSIWYG
Adding a Picture & Alternative Text in a WYSIWYG
Creating a Pop-up Window with an Enlarged Image
Linking a PDF in a WYSIWYG
Anchor Tags within a WYSIWYG
Add / Edit a Table in a WYSIWYG
Copying WYSIWYG Content
Embed a Video (Code Provided)
Embed a YouTube Video
User Management
Add / Edit a User
Add / Edit User Access Levels
Export Users
Import Users
Product Catalog
Add / Edit a Product
Add a Secondary Category
Add / Edit Customizations
Tie Customization to a Product in the Product Catalog
Communications
Export Form Submissions
Add / Edit Forms
Add / Edit List Options
Add a Broadcast Email
Add a Broadcast Template
Utilities
Marketing Tags – Add Tag and Generate URL
File Upload
Reports
Viewing Reports
- Go to http://www.YourDomain.com/admin
- Type in Email and Password and then click Sign On.
- Hover over Content and click Home.
- Click edit to the right of the page you wish to edit.
- Click the gray edit button to the right.
- Here you can make changes to the Homepage Message. *See WYSIWYG information sections to see how to modify the body.
- Click Save Changes when finished.
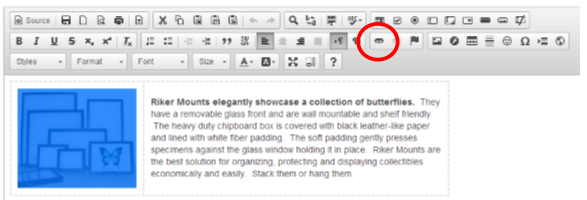
An overview of the WYSIWYG buttons:
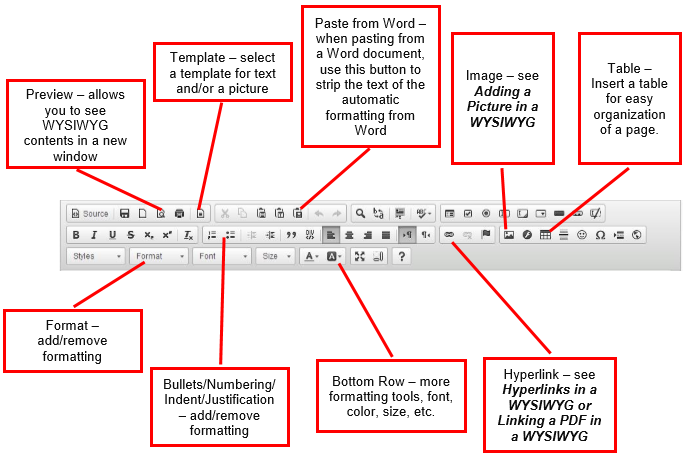
- Preview – allows you to see WYSIWYG contents in a new window
- Template – select a template for text and/or a picture
- Image – see Adding a Picture in a WYSIWYG
- Table – Insert a table for easy organization of a page.
- Paste from Word – when pasting from a Word document, use this button to strip the text of the automatic formatting from Word
- Format – add/remove formatting
- Bullets/Numbering/Indent/Justification – add/remove formatting
- Hyperlink – see Hyperlinks in a WYSIWYG or Linking a PDF in a WYSIWYG
- Bottom Row – more formatting tools, font, color, size, etc.
- When in a WYSIWYG (the fancy boxes that contain the text, shown below), highlight the text or picture you would like to link.
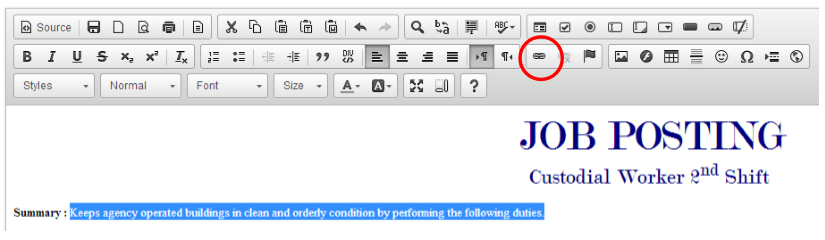
- Select the Hyperlink button circled above.
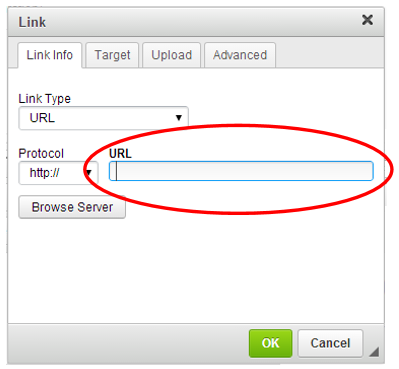
- The hyperlink box will appear, copy and paste the URL that you want the selected text to link to. TIP: In another tab, navigate to the page you wish to link to, highlight the URL in the address bar and copy it. Then paste it in the circled box below.
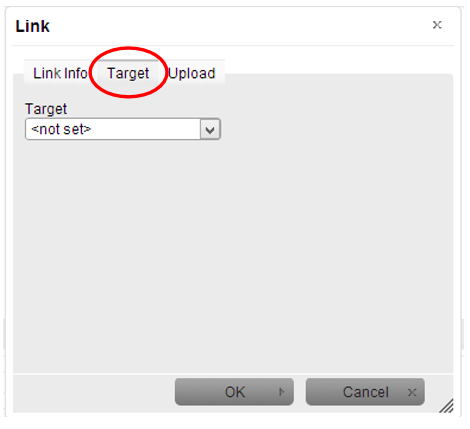
- Before clicking OK, click on the tab that is labeled Target at the top of the hyperlink box. You have a few options to select from the dropdown menu. Here are the two most common:
- <not set> which means the user will navigate straight to the link, without opening a new tab or window. They will need to use their back button to navigate back to this page.
- New Window (_blank). When a visitor clicks on the link the internet browser will open a new window or tab, keeping your site open in the current page. To browse back, a user would simply close the new tab.
- Click OK to save the hyperlink to the PDF. If you hyperlinked text, the text should now be underlined and possibly a different color (depending on your browser).
- When you are done entering all other information on the page, save your changes. TIP: Always go to the “live” page that you just put a hyperlink into and test it to be sure the text was linked correctly.
- When in a WYSIWYG, put the cursor where you would like the picture to appear.
- Select the Image button in the WYSIWYG buttons, shown below.

- Click Browse Server. If the picture you would like is already in one of these folders, simply double click the image you want.
- If not, click Upload.
- Click Add Files, locate the file on your computer, and double click it. TIP: You can upload multiple images at the same time, hold the CTRL or SHIFT key while selecting your pictures from your computer.
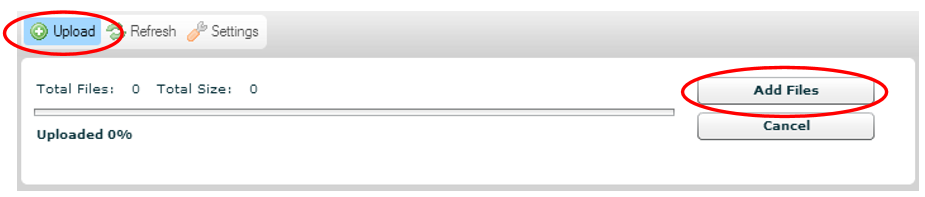
- Once you have selected the file from your computer, click Upload. The file will appear in whatever folder you are in. You can move it by dragging and dropping it into another folder.
- When the file is uploaded, double click it.
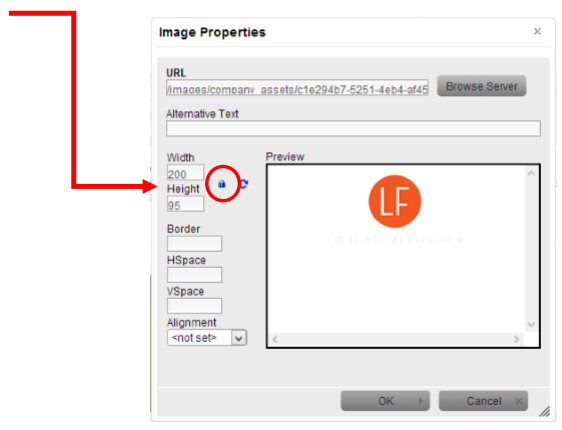
- You can edit the size of an image, this goes by pixels. Be sure to keep the image “locked” if you want it to stay proportional (make sure the lock icon is locked)
- You can also add Alternative Text to your images. Alternative Text is used for SEO purposes. When search engines crawl your site, they can only read text. Adding Alternative Text to your images allows the crawler to be able to “see” what the image is through a description. A good “Alt Text” description would be short sentence briefly describing the picture.
(See the example below in the image properties panel.)
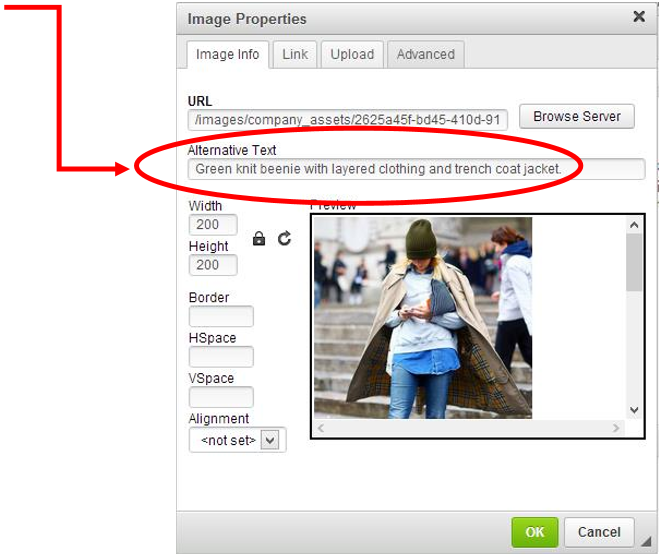
For example; Alt Text for this image reads: “Green knit beanie with layered clothing and trench coat jacket.” The woman and the cellphone were not mentioned because the article was about hats – so the hat is the most important piece of the picture and the woman’s style was second.
- Click OK to save your image.
- When you are done entering all other information on the page, save your changes. TIP: Always go to the “live” page to check your changes.
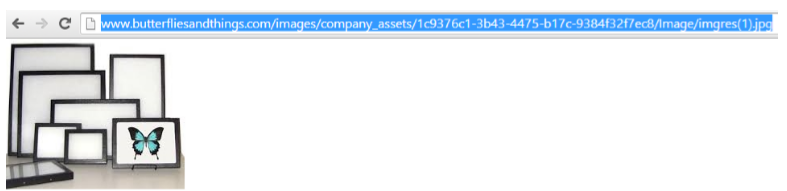
- In a WYSIWYG, double click on the image you wish to make a popup window. The Image Properties box will show. Right click on the image inside the Image Properties box. Then click on the option labeled Open image in new tab. **If you are using different browsers, this phrase could be different.
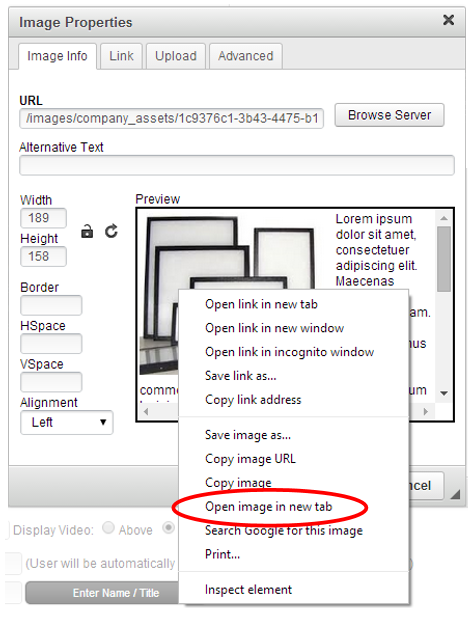
- This will open up a new tab with the image in it. Copy the URL in the address bar (highlighted in blue below).
- Go back to the tab that has the WYSIWYG active. Close out of the Image Properties box by clicking Cancel.
- Highlight the image you wish to make the pop-up for, and click the Hyperlink button in the WYSIWYG (circled below).
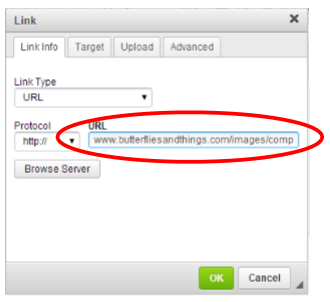
- Paste the URL copied from the previous tab into the URL field.
- Click the Target tab at the top of the Link box.
- Then click <popup window> in the dropdown menu.
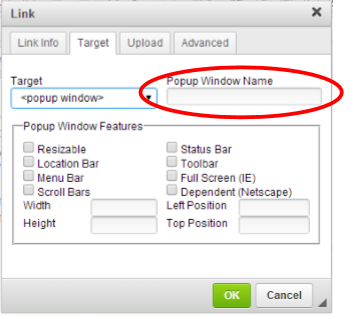
- The only thing that is required here to fill in is the name. Everything else is an option that you are welcome to play with but is not necessary.
- Click OK.
- Don’t forget to save your changes on the page. TIP: Rapid Marketplace always recommends checking any changes on the live site.
- When in a WYSIWYG (the fancy boxes that contain the text, shown below), highlight the text or picture you would like to link to the PDF.
- Select the Hyperlink button in the WYSIWYG buttons, shown below.
- Click Browse Server. If the PDF you would like is already in one of these folders, simply double click the PDF you would like.

- If not, click Upload.
- Click Add Files, locate the file on your computer, and double click it. TIP: You can upload multiple PDFs at the same time, hold the CTRL or SHIFT key while selecting your pictures from your computer.
- Click Upload. The file will appear in whatever folder you are in. You can move it by dragging and dropping it into another folder.
- When the file is uploaded, double click it.
- Before clicking OK, click on the tab that is labeled Target at the top of the hyperlink box. You have a few options to select from the dropdown menu. Here are the two most common:
- <not set> which means the user will navigate straight to the link, without opening a new tab or window. They will need to use their back button to navigate back to this page.
- New Window (_blank). When a visitor clicks on the link the internet browser will open a new window or tab, keeping your site open in the current page. To browse back, a user would simply close the new tab.
- Click OK to save th hyperlink to the PDF. If you hyperlinked text, the text should now be underlined and possibly a different color (depending on your browser).
- When you are done entering all other information on the page, save your changes. TIP: Always go to the “live” page that you just put a hyperlink into and test it to be sure the text was linked correctly.
- Highlight the text you would like to place the anchor (this is the text in the document you want a user to be taken upon clicking a hyperlink in the document).
- Click the Anchor (flag) button in the WYSIWYG, circled below.
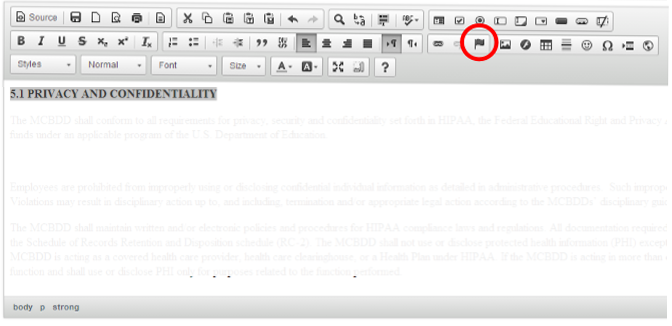
- Give your Anchor a Name – Tip: use the exact text you are anchoring for easy reference.

- Click the OK button.
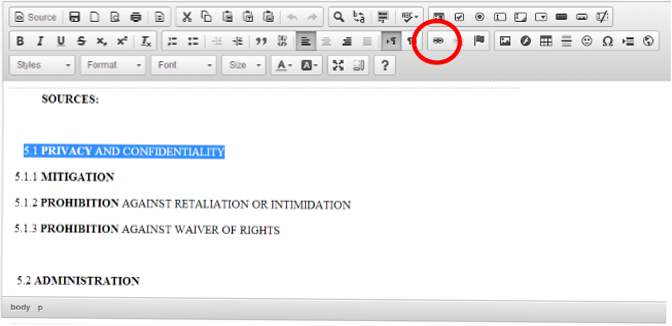
- Find the text in the WYSIWYG that you would like to make the Hyperlink and highlight it (this is the text that users will click on to be taken to the anchored text in the document).
- Click on the Hyperlink (chain) button in the WYSIWYG, circled below.
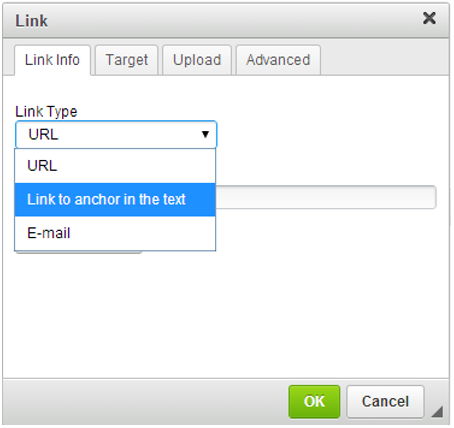
- Select “Link to anchor in the text” for the Link Type.
- Then select your anchor name from the By Anchor Name dropdown list.
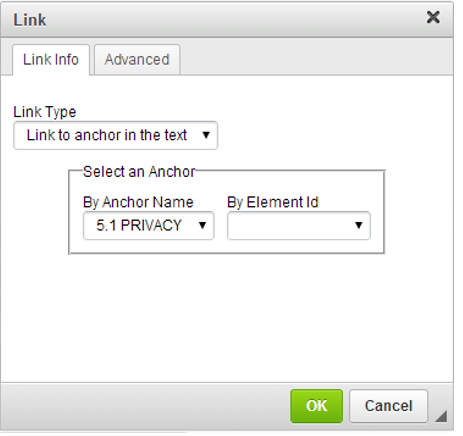
- Click OK.
- Don’t forget to save your changes!
- If done properly, your page on the live side of the site will have the anchor properly working. RMP encourages all users to check changes on the live site.
- In any WYSIWYG editor, place your cursor where you would like to insert the table.
- Click the table button, circled below.

- The following window will pop up. Important things to pay attention to are pointed out and explained.
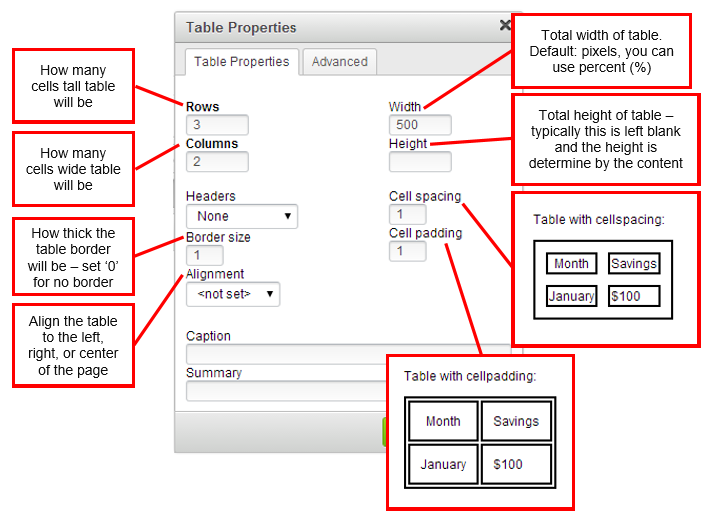
- Select your appropriate settings. Click OK.
- Once the table is created, you may add text, pictures, and hyperlinks within it.
- Save your changes.
- Don’t forget to check your changes on the live site!
- In the CMS, drill down to the content you wish to copy.
- Press the Source key in the WYSIWYG. When you do, the screen should look like this:
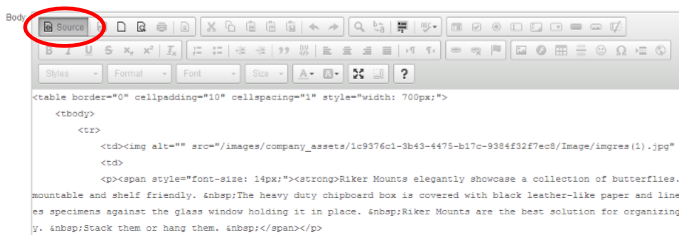
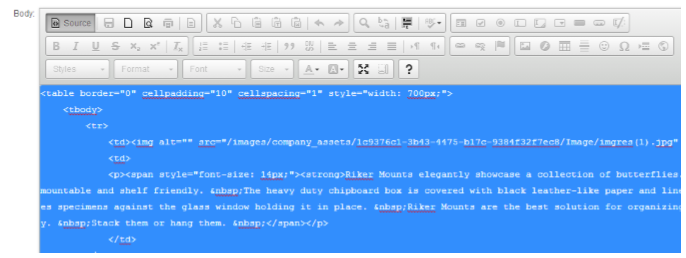
- Select all of the content in the WYSIWYG. TIP: Put your curser in the box and press CRTL+A on your keyboard. The whole area should be highlighted in blue:
- Copy the content. TIP: Press CTRL+C on your keyboard.
- Browse to page you wish to copy the content to. When found, click Source on the WYSIWYG again so that you see the code. (This is important, if you do not do this the pasting will not work correctly.)
- Paste your content in the WYSIWYG. TIP: Put your cursor in the WYSIWYG box and press CTRL+V on your keyboard.
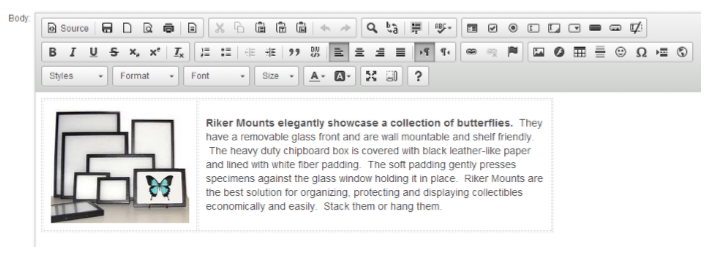
- Click Source again and you should see the content you pasted in formatted properly.
- Don’t forget to save the changes of the page you are working on. TIP: Rapid Marketplace always recommends checking changes on the live site.
- Log into the CMS and browse to the page you wish to embed the video on.
- In the WYSIWYG on that page, click the Source button (very first button in the WYSIWYG, circled below).
- You will see the code that produces what is displayed on that page, locate the spot you would like to embed the video.
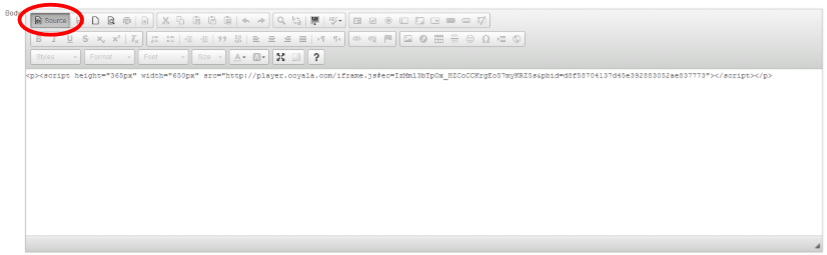
- Paste the embedding code.
- Click Source again.
- Depending on the source of your video, you may or may not see anything indicating that you have embedded the video – you may just see a blank WYSIWYG upon clicking “Source” the second time. To double check, simply go back to the Source mode by clicking Source a third time and you should see the same code you pasted before.
- Click Save Changes at the bottom of the page.
- RMP always suggests you to browse to the page on your live site to test the video.
- Find the video on YouTube.com
- Below the video, click the Share link (located to the right of the ‘About’ link).
- Three choices are available: ‘Share this video’, ‘Embed’, and ‘Email’. Click Embed.
- A text box with coding should come up ready for you to select. BEFORE you do so, decide if you want suggested videos to show up after your video is finished (our recommendation is to turn this feature OFF, because you cannot control the videos YouTube suggests, and sometimes they are irrelevant and inappropriate for your site).
- To turn OFF the suggested videos, uncheck the checkbox next to ‘Show suggested videos when the video finishes’, located under the textbox beneath the ‘Video size’ choices. When you click this, you should see slight changes in the code offered in the textbox.
- You can also select the size you want your video to be from the Video Size dropdown menu. Again, you will see slight changes here to the code provided.
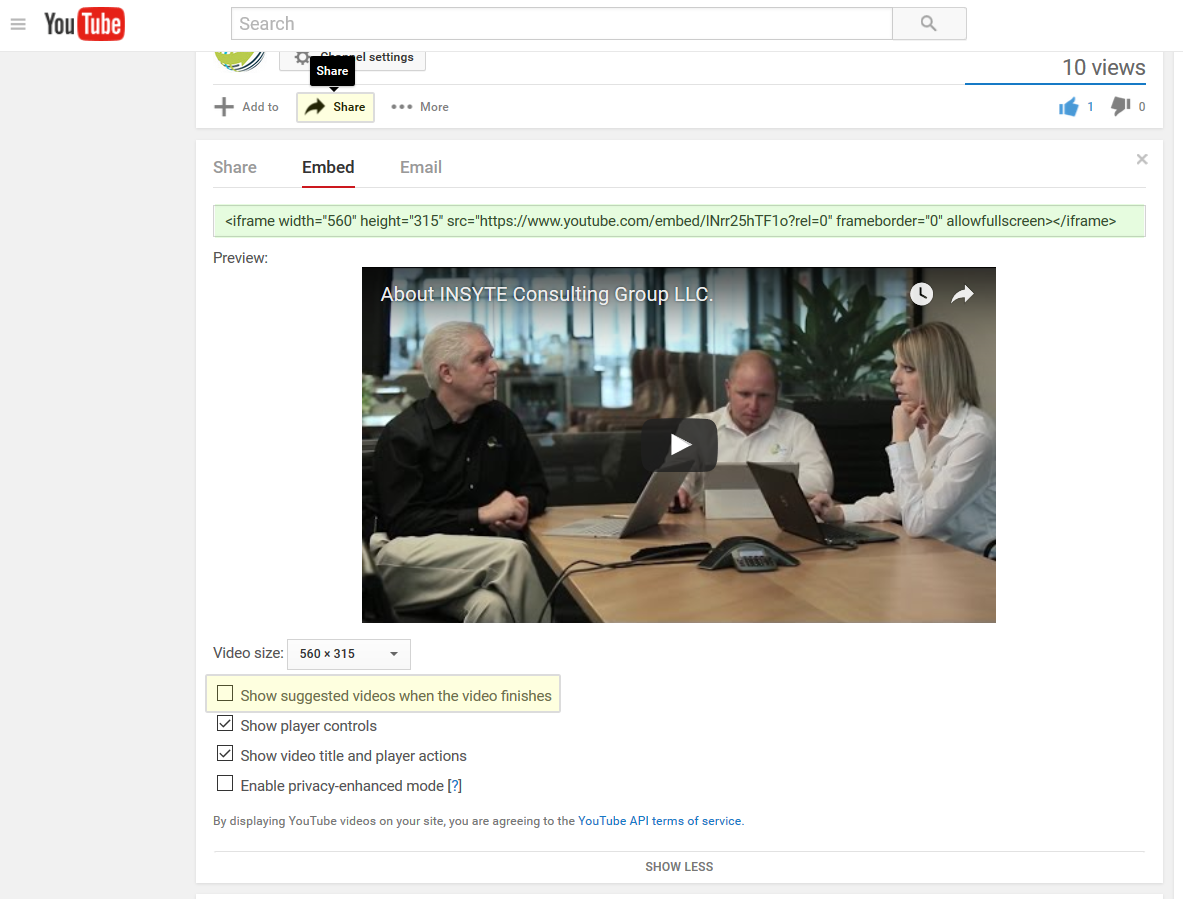
- Once you have the video preferences set up the way you like them, select all of the code provided in the text box by highlighting it.
- Copy it.
- Log into the CMS and browse to the page you wish to embed the video on.
- In the WYSIWYG on that page, click the Source button (very first button in the WYSIWYG).
- You will see the code that produces what is displayed on that page, locate the spot you would like to embed the video.?
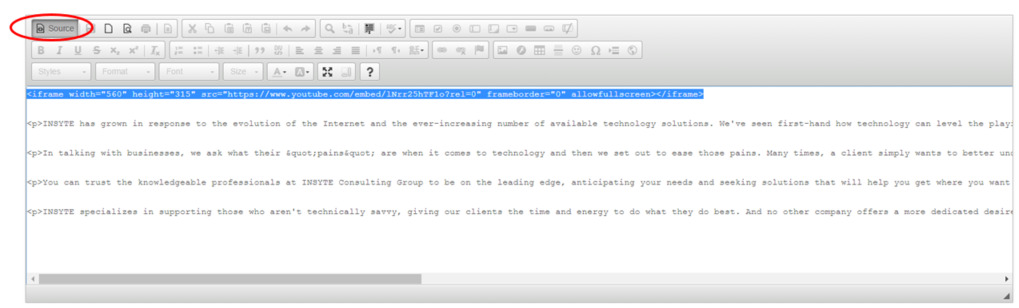
- Paste the code.
- Click Source again.
- If you have done this right, you will see a white box with the phrase “IFRAME” inside it in red.
- You can use the WYSIWYG buttons to center the video or move it to the right (the video will show up in the IFRAME box), or move it up and down if you wish.
- Click Save Changes.
- Browse to the page on your live site to test the video. Be sure to watch it all of the way through to see if the suggested videos show up or if the video just starts over. Depending on what you chose here the video should behave as such.
- Hover over Account Mgmt and click User.
- To edit a user, select the department that user is in under the folder tree on the left-hand side, then click on that user. Or you may use the search function in the upper right-hand corner to pull up a user from any department.
- To add a user click on the gray add user button in the upper right-hand corner.
- Fill out the User Information Form. A couple of key fields:
- Department* – choose which department you want the user to join.
- Email* – this will be the persons login ID.
- Password* – Set this to something generic such as Welcome1, or click Auto Generate to produce a password. Make sure you email the user their password information! (discussed later)
- Require user to change their password on next sign on – check this box if you want to allow the user to change their password—they will be prompted when they first log on.
- User Access – set the user access level, each level has a description beside it.
- Email this user their account information – check this box to make sure the user is delivered their login and password. Email is sent upon saving the user.
- Click Add User / Save User when finished.
- Hover over Account Mgmt and click User Access.
- You may set up a new user access level by clicking Add a New User Access button in the upper right-hand corner.
- Fill out the Name, Type, Description, and choose which modules you would like the user level to have access to. These essentially are the tabs in the navigation bar in the back end. So if you would like an employee to only have access to the reports, choose all of the reports and nothing else. When that user logs in all they will see for their tab options are all of the reports.
- Editing a user access level is the same, just click edit next to the user level you wish to edit.
- When finished, click Save Changes.
- Hover over Account Mgmt and click User Export.
- Select which department(s) you would like to export as well as the field(s) you would like in the file.
- Click Export Users. An Excel file will be produced with your information.
Hover over Account Mgmt and click User Import. Use this import tool one of two ways:
QUICK ENTRY
- You can use the Quick Entry method on the top half of this page, by typing in the required fields, then selecting the Department, Access Level, and/or Virtual Group. After each user has had their fields populated, click Submit and enter the next user’s information.
CSV IMPORT
- For bulk imports, you can upload a properly formatted .CSV file. This process requires a few extra steps, but it's much quicker to import multiple users at once.
- Download the CSV Import Template (#1 shown below).
NOTE: The file that you are going to import must match the fields in this template or else the import will not work.

- Copy/paste or type your information into this template.
NOTE: You must leave the headers the way they are shown in this document. However, not all of the fields must be populated.
- The import document will need to at least have either an email address or a GUID (Globally Unique Identifier) for each existing user, or the import will skip modifying that user as it cannot identify who the user is.
NOTE: The GUID comes from exporting the users out of the website, see above Export Users.
Here is how it works:
- The import will first check to see if a GUID exists for the user:
- If it does find a matching GUID, it will modify the matched user.
NOTE: If an email is provided and the email matches a different user's email, the system skips the user without making any modifications as two users may not have the same email address in the system.
- If it does not find a matching GUID, the import will skip over that user.
- If no GUID is provided, the import will then check for an email address:
- If it does find a matching email, it will modify the matched user.
- If it does not find a matching email, the system will create a new user with that email address.
- If no GUID or email is provided, the import will skip over that user. A user cannot exist in the system without an email address.
- The spreadsheet used for the import document can either wipe out data for users or not change the data for users. There is a setting to chose the behavior you wish to execute: 'Check this box to have all blank fields from the CSV clear out any existing data for the specified user fields. THIS CANNOT BE UNDONE.'
WARNING: If the setting to 'clear out existing data' is checked ON, and there are columns in the import document with BLANK FIELDS, the import WILL WIPE OUT DATA that is currently saved for the users for those fields.
- Save the file on your computer.
- Upload the saved file by clicking Choose File (#2), locating the .CSV file on your computer and double-clicking on it.
- Click Import User Emails.
- Hover over Product and click on Product Catalog.
- Click the grey button labeled Add a New Product.
- Select the Primary Category for the product to be contained in by clicking on one of the displayed folders. The folder should be red once selected.
- Select the Status from the dropdown menu.
- Select the Ecommerce Type from the dropdown menu.
- Available for online purchase – users can purchase this product off the site.
- Request a quote – users cannot purchase this product on the site but can inquire about its cost.
- Display Only – users can view the product, but cannot purchase it on the site.
- Display Only – Discontinued – users will be notified that this product no longer exists, but can view its specs.
- Display Only – Out of Stock – users will be notified that they cannot place the order for this product now, but the product will be stocked again.
- Give the product a Product Name and any other attributes you wish.
- Click Add Product.
- Hover over Product and click on Product Catalog.
- Drill down to the product you wish to add a Secondary Category to.
- Click edit to the right of the product.
- To assign a Secondary Category, select the category you wish to assign in the dropdown menu. Then click add.
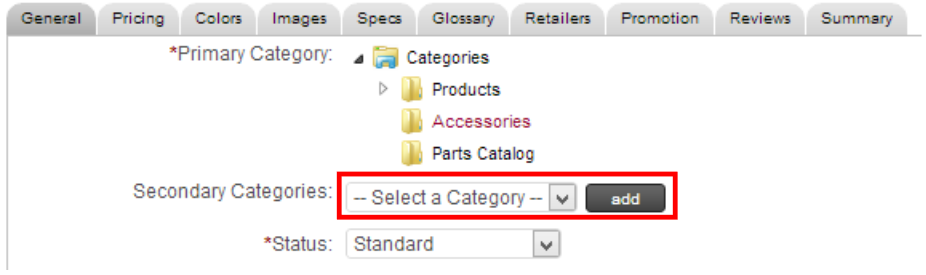
- You can add as many Secondary Categories to a product as you wish. To do so, repeat step 5 above for each new category.
- Once finished, save your changes.
- Hover over Product and click Customization Options.
- Click Add a New Option List.
- Fields to note:
- Option List Name – give the customization list a title.
- Display Name – what the user sees on the front end. TIP: Make this the same as the Option List Name.
- List Type – select from the following choices:
- Dropdown – allows users to select one choice from a drop-down menu.
- Checkboxes – allows users to select more than one choice from a list.
- Radio List – allows users to select one choice from a list.
- Text Box – allows users to type in their customization (ideal for engraving or embroidering).
- Additional Text Entry – allows you to have an extra text box if you have chosen a type of dropdown, checkbox, or radio list. *Cannot be combined with textbox list type.
- Allows the user to specify a specific type of customization or additional instructions on the customization.
- EX. The customization set up is for optional Gift Wrapping on the product. The radio button would be a Yes/No option, but the interface allows for a Gift Message to be included – the user would type the Gift Message in the additional textbox.
- Additional Description – the label that is displayed on the additional text box.
- Text Entry Display Format – you may choose to display the Additional Description in the cart in three ways:
- Just the Text Entered – the additional description does not get displayed at all (e.g. “Blue cloth please”).
- Additional Description After – displays the additional description after the input (e.g. “5” units per bag).+
- Additional Description Before – displays the additional description before the input (e.g. Gift Message: “Happy Birthday Uncle Norm!”).
- Description – add a note to the user explaining/clarifying the customization.
- Click Add List.
- To add options to our list of customizations, click directly on the folder you wish to add customization options to (typically the one you just created).
- Type the customization option you would like to list, and click add item. You may be required to enter in a “File” number depending on your company settings – “0” is an acceptable input for this.
- You can add as many customization items as you wish here, the prices are set within each product on the customization tab. Don’t forget to tie the customizations to the product you would like your users to be able to customize, steps shown below.
- Hover over Product and click on Product Catalog.
- Drill down or use the search function to find the product you wish to add the customization to. Click edit on this product.
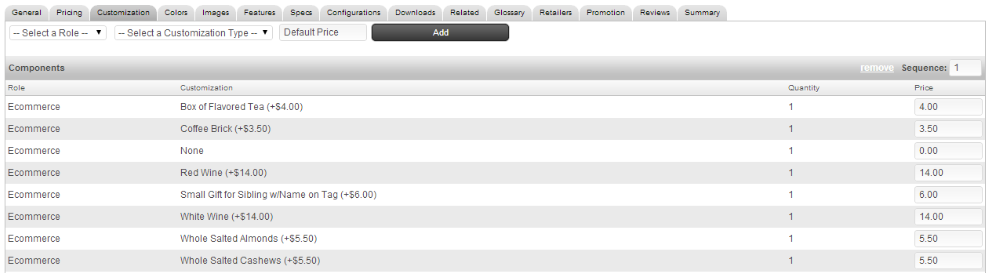
- Once in the product detail page (where you can edit the name, description, etc.) click on the tab labeled Customizations.
- On the Customization Tab, you can add unique customizations to the product. In order to set these up, you must visit the Customization Options tab first. *See Add / Edit Customizations for instructions.
- Once a customization is set up, you can select it in this tab to tie it to this product. Select a Role (Ecommerce User is default).
- Select a Customization Type (set up in the Customizing Products tab).
- Select a Default Price (default to 0.00 if there is no extra charge for customizing). *Individual prices can be set for the customization options.
- Once the customization is set up, you can set individual pricing options to each customization to the very right of the list.
- Don’t forget to save your changes! And, as always, check them on the live site.
- To export submitted forms, hover over Communications and click Forms.
- Click on view submissions next to the form you wish to export the submissions for.
- Check the “Include headers in export” selection, and click Export to .CSV.
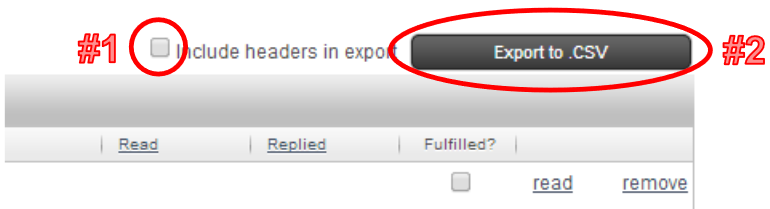
- A .CSV Excel fill will be produced for your use.
- To add or edit a form hover over Communication then click Forms.
- To add a form, click the add a new form button in the upper right-hand corner. To edit the form, select edit main form next to the form you wish to edit.
- Fill in the fields as desired:
- Title *required – the title of the form. This shows up at the top of the form on the live site.
- Opening Text – an introductory paragraph to the form.
- Closing Text – a closing paragraph to a form (some clients put disclaimers and such here).
- Confirmation Text – after a visitor hits submit this is the text that they will see on the next page. Most of the time people put a thank you for submitting message here so that visitors know they received it.
- Meta Tag Title – Put the name of the form here.
- To – the email address that gets sent a notification email to let someone internal know that a form has been submitted.
- CC/BCC – If others should see the submission as well internally.
- Subject – what you want the subject to be when the internal person receives the email. (i.e. Contact Us Form Submission)
- Save your changes. Once you add the form, you will be taken back out to the Forms Folder. Here you can edit the fields that visitors will enter on your form. Click edit fields to the right of the form you want to add/edit fields for.
- Here you will see your basic fields that show up as the defaults. As you can see, you can make each field either:
- Required – a user must fill out this field to submit the form.
- Optional – a user can fill out, but does not need to, the field here.
- Not Displayed – this field will not show up on the form.
- Select each field accordingly.
- You can also reorder the fields in the sequence column. Click in the box of the field you want to move, type in the number where you want it to fall. Arrange other numbers accordingly, then hit Save Changes.
- You can also add fields if you do not see the field you are looking for. Click Add Field in the upper right-hand corner.
- You can select a type here. Some of them are straightforward, some of them are not. It is encouraged for you to play around with the different field types and see how they appear on the live site.
- Label – type what you want the field to be called. This will show up on the live site.
- Required/Optional/Not Displayed – same as 5. (a) – (c) above.
- You can either edit the main form by clicking edit main form to the right of the form or edit the form fields by clicking edit fields to the right of the form. The editing works the same way as adding a form.
- Don’t forget to save your changes and view on the live site.
- To add or edit a field that is being added to a form, hover over Utilities then click on List Management.
- Click Add a New List in the upper right-hand corner.
- Give the list a name and click Add List. For example, if you are adding a simple yes/no button, label it Yes/No so that it can be used multiple places.
- To edit the choices for the list you’ve created. Click on the folder that appears.
- Type in the list item that you would like to appear on the list and click add item.

- You may enter in as many items here as you like. You can now choose this list when creating a field in Forms.
- To send a broadcast email (i.e. newsletter, flyer) hover over Communication and select Broadcast Email.
- Select New Email Communication.
- Select the departments and/or virtual groups you would like to send the email to. Click Next.
- Fill out the broadcast email form.
- Design Template – headers and footers that you can add to any email. *To see how to add a template see instructions for Add a Broadcast Template.
- Top Banner Ad – select an ad to run in the top banner.
- From Email *required – the email address you want the email coming from.
- From Name *required – the name you want the email coming from.
- Subject *required – the subject line of the email.
- Salutation – Dear, Greetings, etc. and choose First Name or Full Name in the dropdown box.
- HTML Message *required – type the body of your message here.
- Non-HTML Message – do not type anything here, the tool will automatically convert your HTML message to a Non-HTML message.
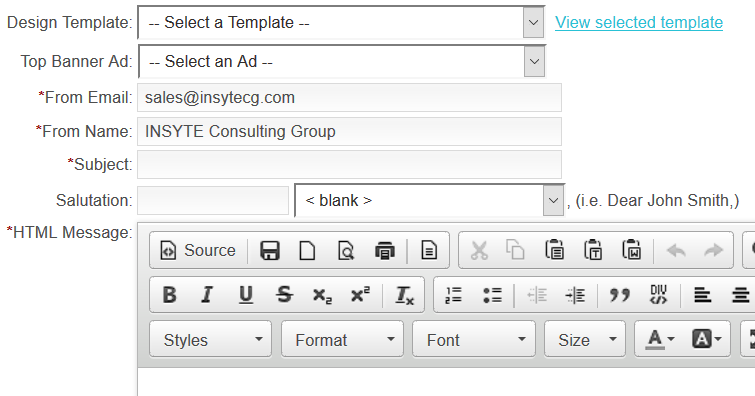
- Click Finish.
- Preview your email on this page, click Next.
- Select Save, Save as Template, Send Now, or Schedule Send, depending on what you would like to do with the email.
- If you click save, the email will go into your Saved Emails tab, and you can send a test email to yourself to preview it before you send it to the masses.
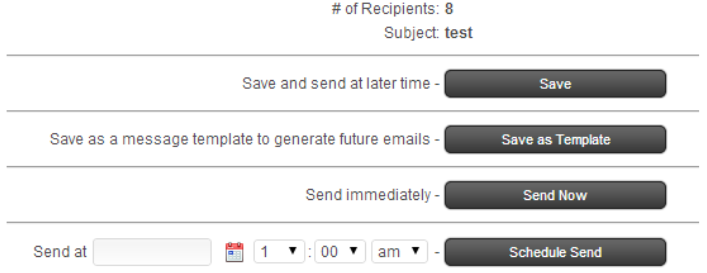
- To send a saved email, click edit to the right of the email and step through the email as before.
- To add a broadcast email template, hove over Communication and select Broadcast Template.
- Click Create a New Template.
- Fill out the template:
- Name *required – give the template a name, such as “Newsletter Template”.
- Header – put the header of the template here. You can include pictures, logos, links, etc. (see WYSIWYG Buttons).
- Body Width *required – set the body width as either a percentage of a page or a pixel size.
- Footer – put the footer of the template here. Again you can include pictures, logos, links, etc.
- Click Add Template.
- You can now select this template for your email communications, it will wrap around the text in the body of the email.
- Log into the CMS.
- Hover over Utilities and click on Marketing Tags.
- At the bottom of the list of existing Marketing Tags, there are fields to add an additional tag. Select the Type from the drop down menu (#1) and enter a Name for the tag in the text field provided. Then click add (#3).

- The Marketing Tag should appear in the list.

- Scroll down to the bottom of the page, here there is a place where a URL can be generated for Ad Placement or Marketing Email / Banner. Select the Marketing Tag just created from the drop down list (#1). Type in the URL where you would like users to be taken to upon clicking on the Ad into the text box (#2). Then click Generate URL.

- A popup box will show with your generated URL as well as three sizes of QR Codes for QR Readers.
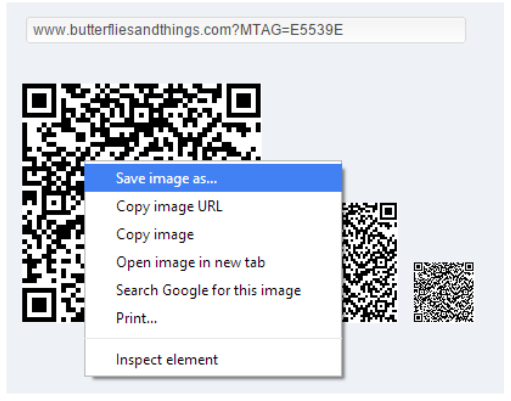
- Either copy and paste the URL to needed or right-click on the QR Code in order to save the image. Or both depending on what your objectives are for the Marketing Tag.
- To upload an image, PDF, video, etc. and then to link that somewhere in the site, use the file upload tool. Hover over Utilities and click on File Upload.
- There may be categories already, or you can create a new one by clicking on the Add a new Category button. These will be the folders you sort your files by.
- Once you are in the category you want to upload in, enter the name of what you are uploading in "1", choose your file "2" and then upload “3”.

- Once it is uploaded, it will show a URL. Copy that URL.
- Where ever you want to link it to, go there and link it. *See Hyperlinks in a WYSIWYG information sections.
- Hover over the Reports tab. Here you will see a list of reports available to you.
- Hover over Reports and click Activity Log. This report shows you what administrators were logged into the site, IP address, and the actions they performed.
- Hover over Reports, and click on Google Analytics. This will take you directly to the Google Analytics portal for you to review your sites metrics.
- Hover over Reports and click Page Popularity. Here you will see the number of views for each page on the site, if you want to see how many times a particular product was viewed this report is helpful.
- Hover over Reports and click User Tracking. This report shows you how a visitor got to your site (entry page), where they came from (referring page), time spent, and number of pages visited. Each line is one visitor, so if you would like more details on that visitor click details to the right on the line—this only works if the user was logged in on their visit.
- Hover over Reports and click Visitors. This gives you a day-by-day log that indicates how many users, mobile visitors, sales, and orders on a particular date. Conversions are the number of sales ÷ number of visitors on the site, i.e. the number of visitors converted into customers. Again, sortable by date range.
Please contact the INSYTE support team now if you have any questions or issues while peforming any operations outlined above.